Running Zeko's DA Node
A critical component of any rollup system is the data availability layer. This layer is responsible for storing all the transaction data that occurs on the rollup.
In this guide we will create a da-layer node that receives transaction data from the Zeko L2 rollup.
Not covered in this guide:
- Running the archive stack used to query historical data. See Running Zeko's Archive Node.
- Exposing your
da-layerto the internet
We will use docker compose to define the whole stack in a single file.
TL;DR skip to the Bootstrap process
Prerequisites
System Requirements
- Linux or macOS (Windows WSL2 works too)
- 1 CPU core, 2GB RAM
Installed Software
Docker
Overview
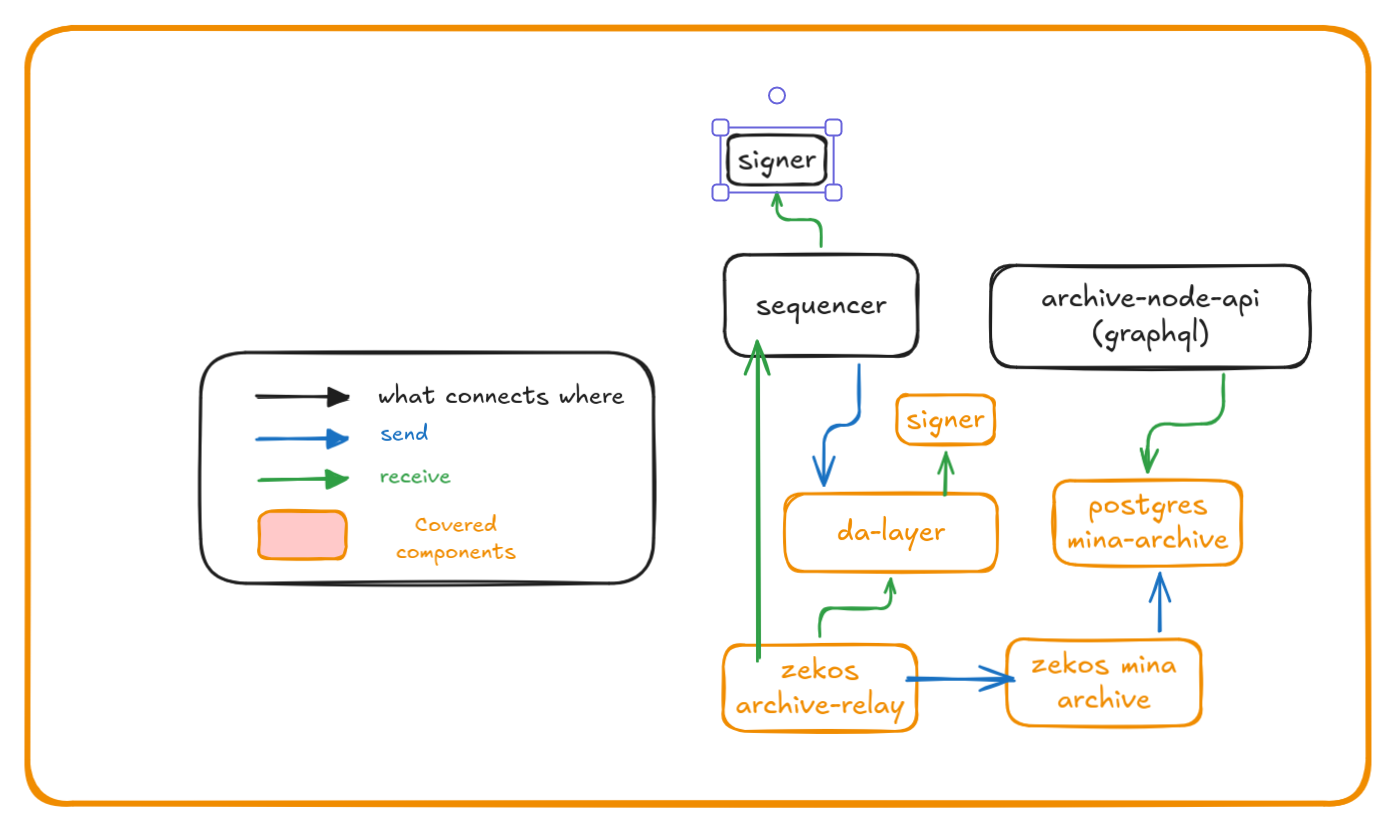
In the diagram above you see:
- Zeko's sequencer sending transactions to
da-layer - the optional archive stack that can index and serve historical data from your DA node
Project Structure
Layout of the project directory:
project-root/
└── docker-compose.yaml
Note:
docker-compose.yamlis using docker volumes to store data. If you prefer to mount local directories instead - change accordingly.
Wallets
To run a da-layer you will need:
da-signer- Holds the wallet credentials that is used byda-layer.da-layer- Eachda-layernode is started with its wallet.
Volumes/files
| Volumes | Files | Purpose |
|---|---|---|
keys_data | da-layer-sk | Private key of the DA node |
keys_data | da-layer-pk | Public key of the DA node (used by sequencer) |
keys_data | da-signer/signer-auth-token | Auth token shared by DA layer and signer |
keys_data | da-signer/signer-tls.crt | TLS certificate for DA layer signer |
keys_data | da-signer/signer-tls.key | TLS private key for DA layer signer |
da-layer_data | Persistent storage for da-layer |
Service Overview
init-configda-signerda-layer
Ports Exposed
| Service | Port | Description |
|---|---|---|
| da-layer | 1924 | da-layer rpc API |
| da-signer | 9001 | da-layer signer |
Bootstrap process
Getting/Creating configuration files
Copy
docker-compose.yamlto your project folder.Click to expand
docker-compose.yamlyamlservices: init-config: image: docker.io/zekolabs/zeko:latest container_name: init-config working_dir: /data volumes: - keys_data:/data/keys entrypoint: - sh - -c restart: "no" command: > "while [ ! -f /data/keys/.keys_created ]; do sleep 2; done; exit 0" da-signer: depends_on: init-config: condition: service_completed_successfully image: docker.io/zekolabs/zeko-da:latest container_name: da-signer ports: - "9001:9001" entrypoint: bash -c command: | "export MINA_PRIVATE_KEY=$(cat /keys/da-layer-sk) && \\ export ZEKO_SIGNER_AUTH_TOKEN=$(cat /keys/da-signer/signer-auth-token) && \\ exec zeko-signer \\ run \\ --host 0.0.0.0 \\ --port 9001 \\ --allow-field-signing \\ --tls-cert-file /keys/da-signer/signer-tls.crt \\ --tls-key-file /keys/da-signer/signer-tls.key" volumes: - keys_data:/keys:ro restart: always da-layer: depends_on: da-signer: condition: service_started image: docker.io/zekolabs/zeko-da:latest container_name: da-layer ports: - "1924:1924" environment: ZEKO_SIGNATURE_KIND: "testnet" entrypoint: bash -c command: | "export ZEKO_SIGNER_AUTH_TOKEN=$(cat /keys/da-signer/signer-auth-token) && \\ export ZEKO_SIGNER_TLS_CA_FILE=/keys/da-signer/signer-tls.crt && \\ exec zeko-da \\ run-node \\ --port 1924 \\ --db-dir /data/db \\ --signer da-signer:9001 \\ --network-id testnet" volumes: - da-layer_data:/data - keys_data:/keys:ro restart: always volumes: da-layer_data: keys_data:Start all services
bashdocker compose up -dCreate
da-layerkeys- Enter
init-configcontainer:
bashdocker compose exec -it init-config bashNote: This image contains
zeko-clibinary.- Create
da-layerkeypair
/data/keys/da-layer-pk/data/keys/da-layer-sk/data/keys/da-signer/signer-auth-token/data/keys/da-signer/signer-tls.crt/data/keys/da-signer/signer-tls.key
da-signer/signer-auth-tokenis the random token shared byda-layerandda-signer.da-signer/signer-tls.crtandda-signer/signer-tls.keyare the self-signed TLS files used byda-signer.The certificate Subject Alternative Name must match the signer host used by
--signer. This Docker Compose file usesda-signer, so the SAN isDNS:da-signer.Note: Take note of
da-layer-pkbash# create `da-layer` keypair zeko-cli generate-even-key | while read label1 label2 value; do if [ "$label1" = "Private" ]; then echo "$value" > da-layer-sk elif [ "$label1" = "Public" ]; then echo "$value" > da-layer-pk fi done mv da-layer-{sk,pk} /data/keys # create `da-signer` auth token and TLS files install -d -m 0700 /data/keys/da-signer openssl rand -hex 32 > /data/keys/da-signer/signer-auth-token chmod 0600 /data/keys/da-signer/signer-auth-token DA_SIGNER_HOST=da-signer DA_SIGNER_SAN=DNS:$DA_SIGNER_HOST openssl req -x509 -newkey rsa:4096 -sha256 -days 3650 -nodes \ -keyout /data/keys/da-signer/signer-tls.key \ -out /data/keys/da-signer/signer-tls.crt \ -subj "/CN=$DA_SIGNER_HOST" \ -addext "subjectAltName=$DA_SIGNER_SAN" chmod 0644 /data/keys/da-signer/signer-tls.crt chmod 0600 /data/keys/da-signer/signer-tls.key touch /data/keys/.keys_created- Enter
If all the steps were performed correctly you have the following:
da-layergetting data from Zeko's L2
Let Zeko know about your DA Layer
In order for you to start receiving transactions from Zeko L2 sequencer you need to:
- Expose your da-layer on the internet
- Contact Zeko and ask to be added to DA node list. You will need to provide:
- your
da-layerpublic key - address:port on which Zeko's sequencer can reach your
da-layer
- your
Synchronizing the data
Once your DA node will be added to Zeko's Sequencer, your node will start receiving transactions. Synchronizing might take some time. It depends when did the sequencer receive a hard reset.
If you want to index that data and query it through an archive API, continue with Running Zeko's Archive Node.